
Recently, I have been working on this React project that allows users to upload some documents which will be tagged to their profile. My initial thought was to figure out how to use the WP REST API to upload to the Media Library. After that’s done, I would need to save the URL of the uploaded files as a custom user meta.
This ‘front-end upload’ feature seems very common in web apps but I couldn’t really find any tutorial on it so I thought it would be useful to create a simple example and explain how I got it to work.
Here’s how the end product looks like:
It’s just a simple JS application that displays a user profile card, which includes an editable profile image. For styling, I’ve opted to use Bootstrap v4.
There are three essential parts to this:
- Upload to Media Library
- Save generated URL as custom user meta
- Re-fetch data to display updated image
1. Upload to Media Library
The WP REST API has a Media endpoint that allows for creating a media item. The tricky part is to make sure the data we are sending via the POST request is valid.
Preparing the data
const profilePicInput = document.getElementById("profile-pic-input");
const formData = new FormData();
formData.append("file", profilePicInput.files[0]);
First, we need to create a new FormData object which allows us to construct a set of form fields with key/value pairs. Since the WP REST API requires a form field with the key set to file, we use the append()method to add that new property and set its value to be the files attribute of the profilePicInput element, which is just a HTML Input with type set to file.
If you want to add a title/caption to the image, you can create another set of form field using the append() method again. For e.g.:
formData.append("title", "Hello World!");
formData.append("caption", "Have a wonderful day!");
These values will appear in their respective fields when the image is uploaded to the Media Library.
Once the data is prepared, we will use the browser’s Fetch API to send a HTTP request.
fetch(mediaEndpoint, {
  method: "POST",
  headers: {
   //when using FormData(), the
   //'Content-Type' will automatically be set to 'form/multipart'
   //so there's no need to set it here
   Authorization: "Basic " + window.btoa("admin:password")
  },
  body: formData
})
Endpoint
The endpoint to use is /wp-json/wp/v2/media, and since we are sending data, the method to be used is POST.
Authentication
Authentication is required because we are sending data to the backend. To simplify things, I’ve decided to use the WP Basic Auth plugin. If you are having issues sending authenticated requests, there are two possible solutions to fix that.
Authorization: "Basic " + window.btoa("admin:password")Note: this method shouldn’t be used in production sites as your credentials will be exposed!
Body
In the request body, we will just send the prepared form data.
Here’s the final code for handling image upload to the Media Library:
/*********************
 * VARIABLES         *
 *********************/
const mediaEndpoint = rootURL + "/wp-json/wp/v2/media";
const form = document.getElementById("profile-form");
const profilePicInput = document.getElementById("profile-pic-input");

/*********************
 * EVENT HANDLERS    *
 *********************/

//Submit image to media library
form.addEventListener("submit", function(e) {
  e.preventDefault();
  const formData = new FormData();
  formData.append("file", profilePicInput.files[0]);
  //display spinner
  toggleSpinner();
  //send image to media library
  fetch(mediaEndpoint, {
    method: "POST",
    headers: {
      //when using FormData(), the 'Content-Type' will automatically be set to 'form/multipart'
      //so there's no need to set it here
      Authorization: "Basic " + window.btoa("admin:password")
    },
    body: formData
  })
    .then(res => res.json())
    .then(data => {
      const input = {
        profile_image: data.source_url
      };
      //send image url to backend
    })
    .catch(err => {
      console.log(err);
    });
});
Note: If you are getting the Specified file failed upload test. error message in your response, it’s likely that the file property is missing (see Preparing the data).
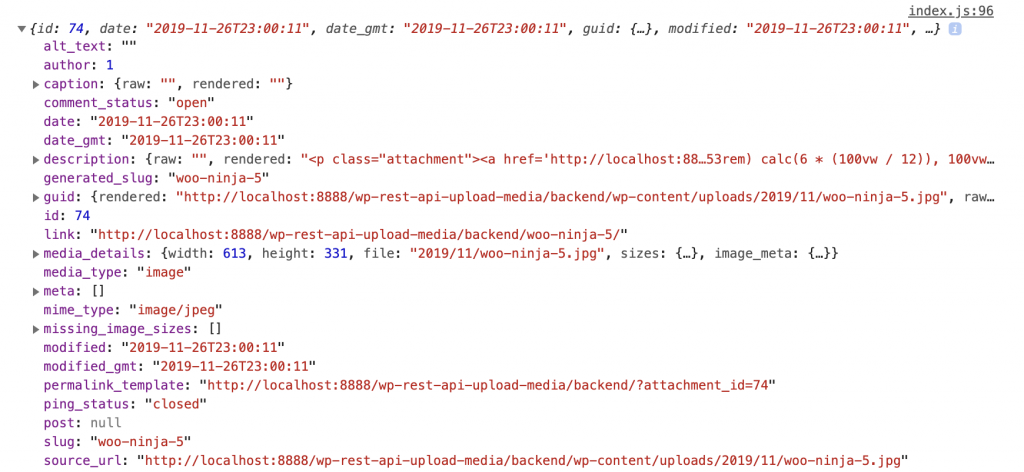
If the upload is successful, we will receive a JSON response with information regarding the uploaded media. The info we need is the image URL, which is stored in the source_url property.
2. Save generated URL as custom user meta
What we want to do now is assign the image to the user account. And to achieve it, we can save the URL of the uploaded media as a user meta.
There are two parts to this – 1) sending the data to an endpoint and 2) creating a plugin that handles the incoming data.
Sending the data
The WP REST API provides a Users endpoint that allows updating of a user profile. Since we are updating our own profile, we can use the /users/me endpoint.
const userEndpoint = rootURL + "/wp-json/wp/v2/users/me";Right after we receive the image source_url, we want to run another POST request, sending that URL to the backend:
const input = {
  profile_image: data.source_url
};
//send image url to backend
fetch(userEndpoint, {
  method: "POST",
  headers: {
    "Content-Type": "application/json",
    Authorization: "Basic " + window.btoa("admin:password")
  },
  //Since the input variable is an object,
  //we need to convert it to a string before sending it
  body: JSON.stringify(input)
})
Handle incoming data
Register new REST field
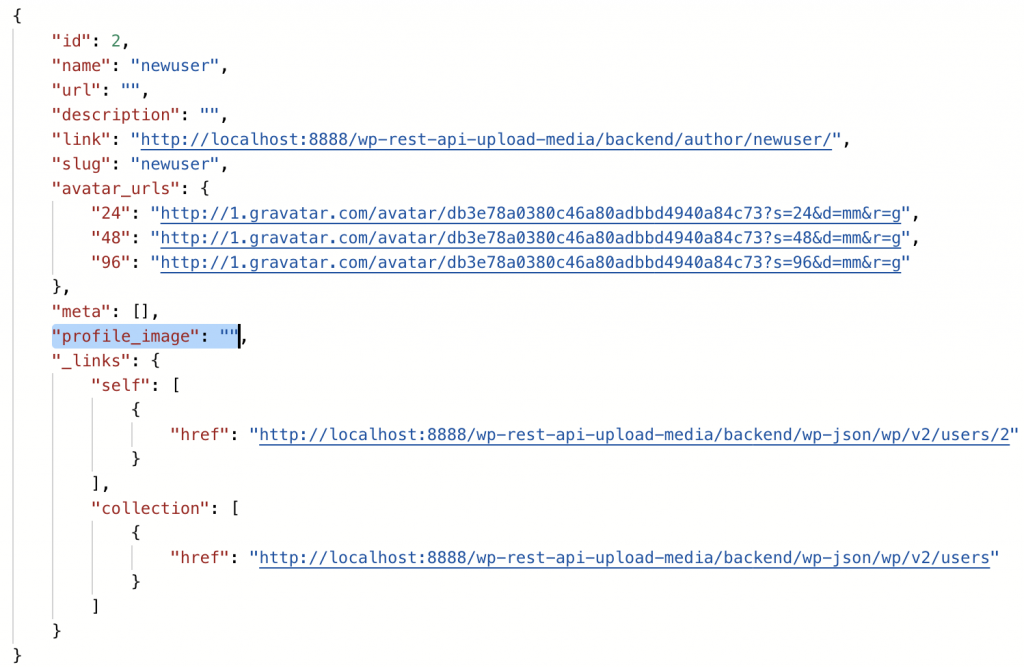
By default, the Users endpoint doesn’t have a “profile image” field for storing the URL so we need to register that as part of the schema first.
Let’s create a plugin to handle this.
<?php
/**
 * Plugin Name: Personal Profile App
 * Description: Customise Users Endpoint for Profile Image upload
 * Author: Edmundcwm
 * Author URI: https://edmundcwm.com
 * Version: 0.1
 */

/**
 * Register field for storing Profile Image URL
 */
function ppa_register_rest_fields() {
	register_rest_field( 'user', 'profile_image', array(
		'get_callback' => 'ppa_get_user_profile_image',
		'update_callback' => 'ppa_update_user_profile_image',
	));
}
add_action( 'rest_api_init', 'ppa_register_rest_fields' );
register_rest_field() allows us to add a new field to the existing User Object Schema. In this case, the new field is named ‘profile_image’:
Next, we need to create a callback function for the GET method. The function should retrieve the profile_image user meta, which holds the image URL:
/**
 * Retrieve 'Profile Image' URL
 */
function ppa_get_user_profile_image( $object ) {
	//get user id
	$userid = $object['id'];

	if ( ! $userid ) {
		return new WP_Error( 'invalid_user', __( 'Invalid User ID.' ), array( 'status' => 400 ) );
	}

	//return user 'profile_image' meta
	return get_user_meta( $userid, 'profile_image', true );
}
Another callback function we need is for the POST method. This takes care of saving the image URL to the database.
/**
 * Update 'Profile Image' URL
 */
function ppa_update_user_profile_image( $value, $object, $field ) {
	// //get user id
	$userid = $object->ID;
	if ( ! $userid ) {
		return new WP_Error( 'invalid_user', __( 'Invalid User ID.' ), array( 'status' => 400 ) );
	}

	//return user 'profile_image' meta
	return update_user_meta( $userid, $field, esc_url( $value ) );
}
Here’s how the entire plugin looks:
<?php
/**
 * Plugin Name: Personal Profile App
 * Description: Customise Users Endpoint for Profile Image upload
 * Author: Edmundcwm
 * Author URI: https://edmundcwm.com
 * Version: 0.1
 */

/**
 * Register field for storing Profile Image URL
 */
function ppa_register_rest_fields() {
	register_rest_field( 'user', 'profile_image', array(
		'get_callback' => 'ppa_get_user_profile_image',
		'update_callback' => 'ppa_update_user_profile_image',
	));
}
add_action( 'rest_api_init', 'ppa_register_rest_fields' );

/**
 * Retrieve 'Profile Image' URL
 */
function ppa_get_user_profile_image( $object ) {
	//get user id
	$userid = $object['id'];

	if ( ! $userid ) {
		return new WP_Error( 'invalid_user', __( 'Invalid User ID.' ), array( 'status' => 400 ) );
	}

	//return user 'profile_image' meta
	return get_user_meta( $userid, 'profile_image', true );
}

/**
 * Update 'Profile Image' URL
 */
function ppa_update_user_profile_image( $value, $object, $field ) {
	// //get user id
	$userid = $object->ID;
	if ( ! $userid ) {
		return new WP_Error( 'invalid_user', __( 'Invalid User ID.' ), array( 'status' => 400 ) );
	}

	//return user 'profile_image' meta
	return update_user_meta( $userid, $field, esc_url( $value ) );
}
3. Re-fetch data to display updated image
If everything is successful, we want to close the modal and re-fetch the data from the server to show the latest values:
.then(res => res.json())
.then(data => {
  //clear file input text content
  fileLabel.textContent = "";
  //hide spinner
  toggleSpinner();
  //close modal
  $("#exampleModal").modal("hide");
  //re-fetch data from server
  getData();
})
.catch(err => {
  console.log(err.message);
});
The getData() helper function handles the fetching of data from the server. Here’s how it looks like:
//Handle fetching of data from server
function getData() {
  //hide Card display to mimic loading
  wrapper.style.opacity = 0;
  fetch(userEndpoint + "?context=edit", {
    method: "GET",
    headers: {
      Authorization: "Basic " + window.btoa("admin:password")
    }
  })
    .then(res => res.json())
    .then(data => {
      //re-display card after response is received
      wrapper.style.opacity = 1;
      name.innerHTML = `${data.last_name} ${data.first_name}`;
      description.innerHTML = data.description;
      profilePic.innerHTML = data.profile_image
        ? `<img class="card-img-top" src="${data.profile_image}" alt="${data.last_name}" />`
        : "No Image found";
    })
    .catch(err => {
      console.log(err);
    });
}
Do note that for fetching of data, I added the context=edit argument because I want to retrieve the user’s first and last name. If the argument is omitted, the value will be set to default and the info returned will not contain what I want.
And that’s it! We have successfully uploaded a media document to the WP Media Library from a JavaScript application using the WP REST API.
Happy JavaScript-ing!
Leave a Reply