
At the Contributor’s Day of WordCamp Singapore 2019, I ran a workshop on how to build a simple CRUD app using the WP REST API. Unfortunately, due to time constraint, I didn’t manage to explain the source code as much as I would like to. So the purpose of this series of posts is to make up for that!
Part 1: using the GET method to retrieve data
Part 2: using the POST method to create data
Part 3: using the PUT method to update data
Part 4: using the DELETE method to delete data
This is the end product of the app.
And here is the source code.
Let’s get started!
Setting up the back-end
First, let’s setup a blank WordPress Installation and install the WP Basic Auth plugin. This plugin works out of the box so we just need to activate it and leave it as it is. Why do we need this plugin? Well, since we are going to create, edit and delete posts from outside of WordPress, we would need some form of authentication; it going to be extremely scary if anyone could just perform those actions without proper credentials!
So this is what the plugin does – it provides a very basic method for us to authenticate ourselves before we can manipulate data from outside the wp-admin.
Important – You should never use this plugin on production sites because you will be exposing your username and password (we will see this later)!
The last step is to change the permalink structure. This can easily be done by going to Settings > Permalinks > Post name > Save changes. It should also work if you choose to use Day and Name, Month and name, Numeric or Custom, as long as it’s not the default! Read here for more info on this.
To the front-end
Since this is a fairly simple and small app, there is only one file we need to look at – index.js located in /assets/js/. So clone or download the repo and open up that file.
root URL
First, let’s replace the hardcoded url stored in the siteURL variable in line 1. This should be the url of your WP site because this is where we will be fetching all the posts from.
const siteURL = 'http://localhost:8888/restapi'; //Replace this with the url of your WP siteOn line 2, we have the apiRoute variable which stores the base path of the API and the endpoint.
const apiRoute = '/wp-json/wp/v2/posts';This will be the same for every WP site so we don’t need to change anything. Depending on which HTTP method we use (either GET or POST), this endpoint will retrieve a list of posts or allow us submit a new post.
If you are unsure of what terms like base path and endpoint mean, you might want to read the intro post I’ve written which covers some basic terminologies of the WP REST API.
Now that we have the site url replaced, we can begin the fun part!
Displaying the list of posts
For this part, we will be using the GET http method. Let’s create a function called fetchPosts().
/******************************************
 * GET ALL POSTS
 ******************************************/
function fetchPosts() {
    const wrapper = $('.post-wrapper');

    //clear posts list
    wrapper.empty();

    //insert spinner
    wrapper.append(spinner);

    $.ajax({
        method: 'GET',
        url: siteURL + apiRoute,
    })
    .done(function(response) {
        console.log(response);
    })
    .fail(function(response) {
        //log error message if AJAX fails
        console.log(response);
    })
    .always(function() {
        $('.spinner').remove();
    })
}
For this app, we will be using the jQuery $.ajax method to make HTTP requests. Since we are retrieving data, the HTTP method to use would be GET. And the URL to retrieve the posts would be our WP site (of course!). That’s not enough though. We need to append the apiRoute to tell the app to retrieve only posts (not users or pages etc.). So the siteURL + apiRoute value should translate to something like this: http://localhost:8888/restapi/wp-json/wp/v2/posts.
Before we fire the Ajax call, we also want clear the existing list of posts(if any) and append a spinner to inform the user that we are fetching data. And most importantly, we need to execute the function when the app loads.
This is how our code should look like at this point:
/******************************************
* GET ALL POSTS
******************************************/
function fetchPosts() {
const wrapper = $('.post-wrapper');
//clear posts list
wrapper.empty();
//insert spinner
wrapper.append(spinner);
$.ajax({
method: 'GET',
url: siteURL + apiRoute,
})
.done(function(response) {
console.log(response);
})
.fail(function(response) {
//log error message if AJAX fails
console.log(response);
})
.always(function() {
$('.spinner').remove();
})
}
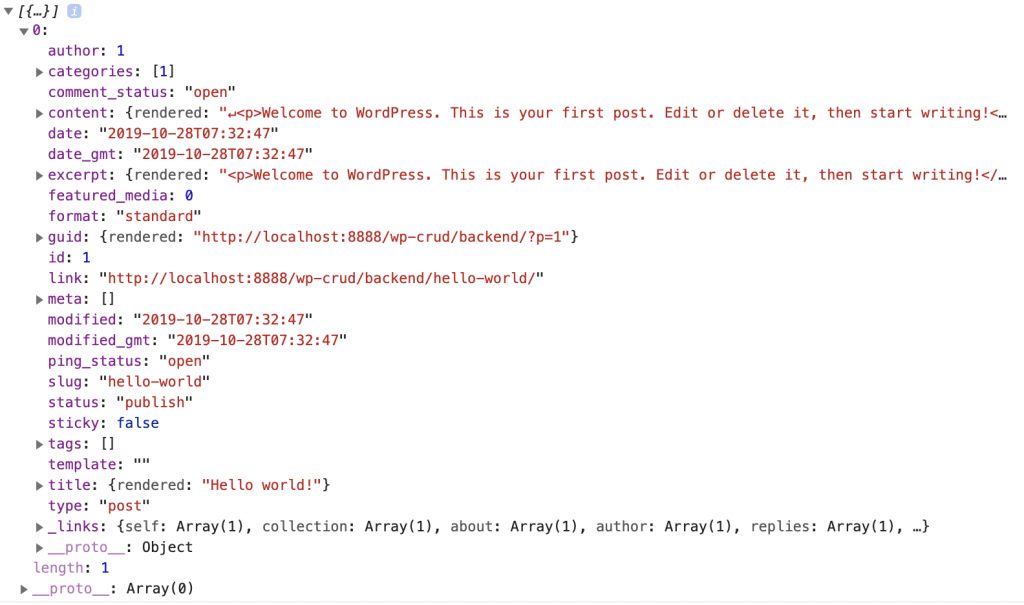
fetchPosts();If we run the function now, we shouldn’t see anything appearing on the browser and that’s because we are only console logging the output. If we look at the console, we should see something like this (assuming there are no errors):
Now that we have the data we need, it’s time to output them in the app. To do so, replace console.log(response).done() callback:
.done(function(response) {
   if ( ! response.length ) {
      const message = '<p>No posts found</p>';
      $('.post-wrapper').append(message);
   } else {
      posts = renderPost(response);
      $('.post-wrapper').append(posts);
   }
})
A ‘No posts found’ message will be displayed if no posts is found. Otherwise, we will utilise renderPost() , a helper function, to generate the markup of individual post and output it to the DOM.
Here is how the renderPost() function works:
//render individual post display
function renderPost(posts) {
    let postListing = '';
    posts.forEach(post => {
        postListing +=
            `<div class="post uk-background-default uk-padding-small uk-margin-bottom">
                <article>
                    <div class="user-info uk-flex uk-flex-middle">
                        <span class="user-info__pic uk-height-1-1 uk-margin-small-right" uk-icon="icon: user; ratio: 1.5"></span>
                        <p class="uk-text-small uk-text-bold uk-text-emphasis">Edmund</p>
                    </div>
                    <div class="user-content">
                        ${post.content.rendered}
                    </div>
                    <hr />
                    <div class="user-controls">
                        <span class="uk-text-small user-controls__btn delete-post" data-id=${post.id}>Delete</span>
                        <span class="uk-text-small user-controls__btn edit-save-post" data-id=${post.id}>Edit</span>
                        <span class="uk-text-small user-controls__btn cancel-edit is-inactive" data-id=${post.id}>Cancel</span>

                    </div>
                </article>
            </div>`;
    });

    return postListing;
}
(The class names are from the UIKit front-end framework, which we are using for basic styling.)
Now, we should be able to see our posts appearing:
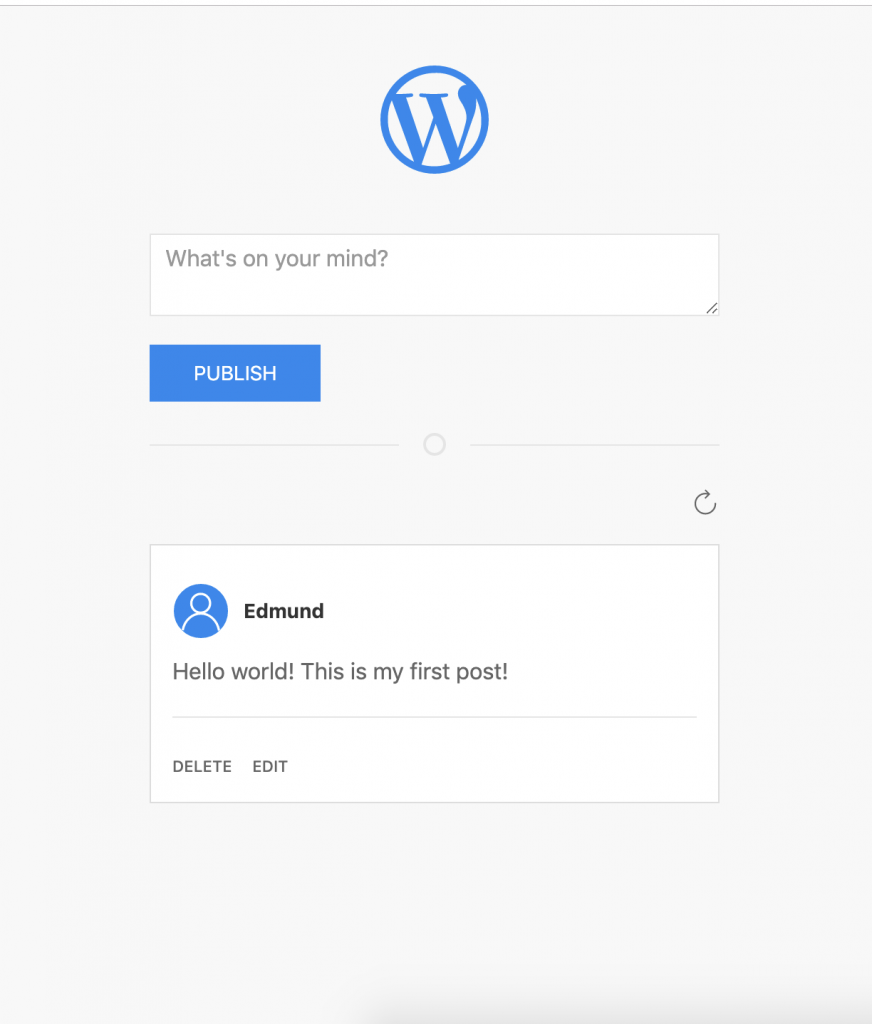
We are only displaying the post content in our app. Feel free to modify renderPost() and display other info you like!
Congrats! You have successfully retrieved posts from your WP site via the WP REST API!
Let me know in the comments section if you have any questions.
Next, we will look at using the app to create a post.
Leave a Reply